Essential Equipment And Accessories For Travel Photography
If you’re been reading the blog for a while, you know how sold I am to my Olympus camera. I still am! Trust me – I broke it earlier this year while in Austria (I dropped the camera on the cement table and watched continue its fatal fall on the wooden chair and on the ceramic floor. I am the world’s clumsiest blogger. A slight “ugly cry” episode ensued) and I bought another one on the spot, in euros, because I couldn’t fathom getting anything else.
So yeah, Team Olympus here. *waves*
But that being said, a good camera does not a good photographer make. You need talent and curiosity, of course, but also and perhaps most importantly, you need the right gear. Having the world’s best camera won’t matter if you don’t know how to use it to its full potential.
And since I’m all for smart, no-nonsense equipment that won’t break your back nor your bank, these are small items that don’t cost a fortune but that pack a punch.
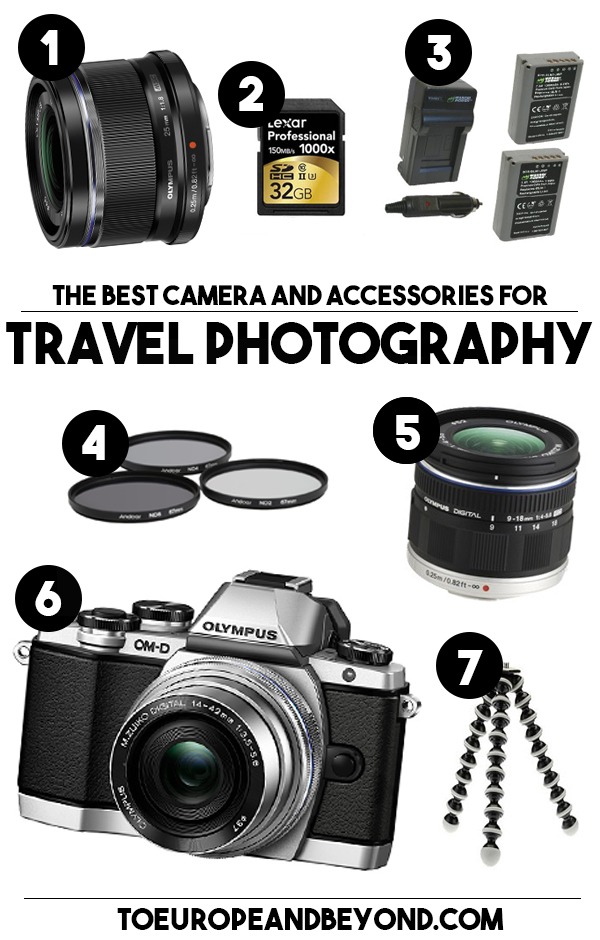
1. 25mm f1.8 lens
This lens has a nice natural brightness and depth of field to it; therefore, it requires very little post-editing, which is something I can definitely get behind. Prime lenses do one thing, and one thing only, but they do it flawlessly. I’d say I shoot 75% of the time with this lens because it consistently gives me the results I want. Sure, not having a zoom gets a little bit of getting used to but considering the amazing results I get (especially with portraits, food, and urban photography) I’m willing to work a little harder to get the perfect angle.
2. Professional Lexar SD Card
Never underestimate how much space you need on an SD card! Lexar cards are best for travel as they capture high-quality images and extended lengths of 1080p full-HD. I can go several days without filling it up, which, considering I usually take upwards to 400 photos a day, is not bad at all. The cards also feature high-speed file transfer from card to computer for easy breezy backups.
Also, keep in mind that the higher the quality of your card, the faster they’ll record the images. Getting a Lexar means you won’t have to worry so much about pixelated or blurry shots.
3. Extra battery
Although I rarely fill up my SD card, I do frequently use up my battery. Rookie mistake, I know! How many times have I rushed back to the hotel for an emergency charging session? Lesson learned: I now carry an extra battery everywhere I go, just in case.
Side note: I don’t recommend getting the cheaper versions of this battery (or any other charger, for that matter), or packs that come with extra gizmos. These are well-documented sub-par quality and can easily catch fire while charging. You’ll end up having much bigger problems on your hand than a $15 difference!
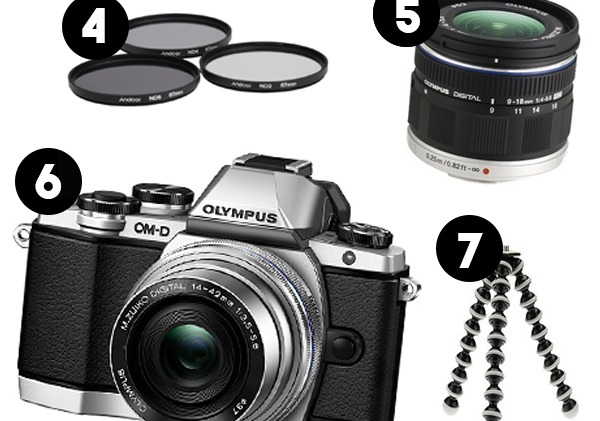
4. Filters
Filters are a very personal affair from what I’ve gathered while reading about travel photography accessories. Some people only swear by polarizers, others think that each situation calls for its own filter. I am unfortunately not a billionaire (donations welcome, though) so I had to stick to the basics: I picked a regular, basic filter that would not only give me better colours and light, but also protect my expensive lenses.
I’m a very lazy photographer and I can’t be bothered to put the cover back on every time I take a picture. These lenses are life-savers!
5. 9-18mm f/4.0-5.6 lens
This is a wide angle lens that is both versatile and easy to use. I like how it helps me give a sense of place to my pictures by including so many details in a single frame. Contrary to most inexpensive wide angle lenses, this one doesn’t add intense vignettes and doesn’t have that annoying fish-eye effect. Sure, there are better and more performant wide angle lenses out there, but they are also much more expensive. This is a great option for entry-level travel photographers.

6. OLYMPUS OM-D E-M10
I wanted a light and powerful camera that was simple to use on my travels, with changeable lenses and within my price range; in other words, I wanted the unicorn of travel photography – I found it with this Olympus. My favourite things? The weight (compared to a DSLR camera), the LCD touchscreen, the manual mode, and the Wi-Fi connection.
I think that mirrorless cameras are the best option for amateur travel photography. This camera will do the trick without requiring any compromise on your part; the photos are good enough for you to print them and display them in your home proudly. I know I do! Because bulk and performance were my two biggest concerns, I am extremely happy with my decision to ditch my dSLR. I now exclusively shoot with my Olympus O-MD E-M10 and I’ve fallen in love with the touchscreen.
7. GorillaPod (compatible with mirrorless cameras)
I dislike heavy camera equipment, but I am not willing to sacrifice performance or quality; cue this light-weight tripod and its flexible, wrappable joints.This is what I use for night-time travel photography. Although the Olympus OMD-EM-10 performs very well in low light, especially when paired with the powerful 25mm f1.8 lens, you’ll want to have a tripod if you want to do special effects like light trails or tap into advanced techniques.
[disclaim]Because I like to keep it real, every product recommended on this page is something I personally endorse and not paid placements; however, some contain affiliate links, which means I earn a small percentage of the sale when you purchase through them at no extra cost to you. This helps cover the increasing costs of running this blog – thank you for supporting To Europe And Beyond![/disclaim]